Showing posts with label Italian Food. Show all posts

Summer Peach Cake


When we first started this blog, I said I wasn't into making complicated desserts. I was just a mix and bake kind of a girl. This dessert is making a big fat liar out of me.

Perhaps having a cooking blog has pushed me to try a little harder in the dessert department. Or maybe I just wanted to use my new springform pan. Or maybe I just wanted to make something awesome with summer peaches while they're still here. The thing is, this dessert required way more effort than I'd normally want to expend for one little cake. It's a Cook's Illustrated recipe, so naturally, it has a thousand steps, yet it is also super-delicious. Trade-off.

It's probably not as complicated as making a peach pie, though. If you see me making double-crust pies on here, then you'll know I've officially lost my mind. You have to draw the line somewhere.

We had a little BBQ at our house over Labor Day weekend with John's family (hi Fred!), and this cake followed a pretty serious pulled pork dinner. A slice of this cake with a scoop of vanilla ice cream was the perfect way to end the meal, and bid a fond farewell to summer.


Summer Peach Cake
from Cook's Illustrated

Note: If using farm-fresh peaches, you should omit the peach Schnapps (I omitted). Also, the addition of Panko breadcrumbs seems weird, but I promise you won't notice them in the cake. They help to absorb the excess juices so your cake won't get soggy.


Ingredients:

2 1/2 pounds peaches , pitted and cut into 1/2 inch-thick wedges
5 tablespoons peach schnapps
4 teaspoons lemon juice
6 tablespoons plus 1/3 cup granulated sugar
1 cup (5 ounces) all-purpose flour
1 1/4 teaspoons baking powder
3/4 teaspoon salt
1/2 cup packed (3 1/2 ounces) light brown sugar
2 large eggs
8 tablespoons unsalted butter, melted and cooled
1/4 cup sour cream
1 1/2 teaspoons vanilla extract
1/4 teaspoon plus 1/8 teaspoon almond extract
1/3 cup panko bread crumbs, finely crushed

Instructions:

1. Adjust oven rack to middle position and heat oven to 425 degrees. Line rimmed baking sheet with aluminum foil and spray with vegetable oil spray. Gently toss 24 peach wedges with 2 tablespoons schnapps, 2 teaspoons lemon juice, and 1 tablespoon granulated sugar in bowl; set aside.

2. Cut remaining peach wedges crosswise into thirds. Gently toss chunks with remaining 3 tablespoons schnapps, remaining 2 teaspoons lemon juice, and 2 tablespoons granulated sugar in bowl. Spread peach chunks in single layer on prepared sheet and bake until exuded juices begin to thicken and caramelize at edges of sheet, 20 to 25 minutes. Transfer sheet to wire rack and let peaches cool to room temperature, about 30 minutes. Reduce oven temperature to 350 degrees.

3. Spray 9-inch springform pan with vegetable oil spray. Whisk flour, baking powder, and salt together in bowl. Whisk brown sugar, 1/3 cup granulated sugar, and eggs together in second bowl until thick and homogeneous, about 45 seconds. Slowly whisk in butter until combined. Add sour cream, vanilla, and 1/4 teaspoon almond extract; whisk until combined. Add flour mixture and whisk until just combined.

4. Transfer half of batter to prepared pan; using offset spatula, spread batter evenly to pan edges and smooth surface. Sprinkle crushed bread crumbs evenly over cooled peach chunks and gently toss to coat. Arrange peach chunks on batter in even layer, gently pressing peaches into batter. Gently spread remaining batter over peach chunks and smooth top. Arrange reserved peach wedges, slightly overlapped, in ring over surface of cake, placing smaller wedges in center. Stir together remaining 3 tablespoons granulated sugar and remaining 1/8 teaspoon almond extract in small bowl until sugar is moistened. Sprinkle sugar mixture evenly over top of cake.

5. Bake until center of cake is set and toothpick inserted in center comes out clean, 50 to 60 minutes. Transfer pan to wire rack; cool 5 minutes. Run paring knife around sides of cake to loosen. Remove cake from pan and let cool completely, 2 to 3 hours. Cut into wedges and serve.


Serves 8 to 10

Download a printable recipe.

Yes, my plate does say, "Hot Mess"


Sherried Pineapple Pork Tenderloin


My main motivation for making this recipe was that it would use up one of the 5 little cans of pineapple juice that have been taking up space in my pantry since we lived in our old apartment. I can't even remember what I originally bought it for. I had no idea that this would become a favorite in our house... I made it two weeks in a row, which is something I almost never do.  And I might even make it next week, since I still have three cans of pineapple juice left. The sauce is so good that John convinced me that we needed to save the remaining two tablespoons of it, because surely we'd find something to dip in it. Oh, and did I mention that it's quick and easy to make?

The original recipe says that it serves four, but that's just silly. My portion was what you see above, so I'm going to say it serves two. If you've got more people to feed, this could easily be doubled. We ate ours with some delicious pear, walnut, and feta salad.

Sherried Pineapple Pork Tenderloin
adapted from Cooking Light: Fresh Food Fast

Ingredients:

1/2 tsp black pepper
1 tsp kosher salt
1 1 lb. pork tenderloin
1 tbs vegetable oil
1 6oz can pineapple juice
2 tbs sugar
2 tbs dry sherry (you could substitute dry white wine)
1 tbs low-sodium soy sauce

Directions:

1. Rinse pork and pat dry with paper towels (you want it to be dry so it will sear properly). Sprinkle evenly with salt and pepper.

2. Heat a nonstick skillet over medium-high heat and coat with vegetable oil, add pork. Cook pork 3 to 4 minutes or until browned, turning occasionally. Reduce heat to medium-low; cover and cook 10 minutes. Turn pork over, cook 10 minutes or until a thermometer registers 160 degrees.

3. Place pork on cutting board; tent with foil. Let it stand while you make the sauce.

4. Combine pineapple juice and remaining 3 ingredients; add to pan drippings. Bring to a boil; boil 5 minutes or until liquid is reduced to about 1/4 cup.  Slice pork and spoon sauce over slices.

Serves 2
 
Download a printable recipe.

Blueberry Scones


I'm sure I will forever think of these as "hurricane scones." John and I were enjoying a few days at the Jersey Shore this week, and had to end our stay early due to the evacuations. The night before we left, we discussed what we wanted to eat while we were holed up during Irene, and scones seemed like good comfort food. We passed through Hammonton, NJ on our way home, which happens to be the blueberry capital of the world (or so it claims). So, we picked up some fresh blueberries at a farm stand and were ready for some stormy-weather baking.

If you've ever had a true British scone, these are not the same. They are also not the crumbly, dry American version you might pick up at Starbuck's. They are a bit crispy and sweet on the outside, and moist and tender on the inside. I thought they might be nice served with some lemon curd, but I didn't think it was worth going to the grocery store and fighting my way through the pre-storm crowds just to pick up a jar. You should have these with a cup of tea (preferably with milk, if you're going to be all British about it).

One somewhat unusual step in this recipe is to grate the butter. Make sure yours is good and frozen or this won't work so well. The rest of the process is kind of similar to making biscuits: you have to roll and shape the dough without over-working it. You'll definitely need a bench scraper if you're going to attempt this recipe. These are best eaten warm out of the oven, but you can freeze the dough once you've prepared it and heat them up when you're ready to eat them (further directions are below).   

If you subscribe to Cook's Illustrated, you can check out a helpful video of how to make these scones on their website.

Blueberry Scones

Note: It is important to work the dough as little as possible—work quickly and knead and fold the dough only the number of times called for. The butter should be frozen solid before grating. In hot or humid environments, chill the flour mixture and workbowls before use. While the recipe calls for 2 whole sticks of butter, only 10 tablespoons are actually used (see step 1). If fresh berries are unavailable, an equal amount of frozen berries (do not defrost) can be substituted. An equal amount of raspberries, blackberries, or strawberries can be used in place of the blueberries. Cut larger berries into 1/4- to 1/2-inch pieces before incorporating. Refrigerate or freeze leftover scones, wrapped in foil, in an airtight container. To serve, remove foil and place scones on a baking sheet in a 375-degree oven. Heat until warmed through and recrisped, 8 to 10 minutes if refrigerated, 16 to 20 minutes if frozen. See final step for information on making the scone dough in advance.

Ingredients

 
16 tablespoons unsalted butter (2 sticks), frozen whole (see note above)
 1 1/2 cups fresh blueberries (about 7 1/2 ounces), picked over (see note)
 1/2 cup whole milk
 1/2 cup sour cream
 2 cups unbleached all-purpose flour (10 ounces), plus additional for work surface
 1/2cup sugar (3 1/2 ounces), plus 1 tablespoon for sprinkling
 2 teaspoons baking powder
 1/4 teaspoon baking soda
 1/2 teaspoon table salt
 1 teaspoon grated lemon zest

Instructions
 

1. Adjust oven rack to middle position and heat oven to 425 degrees. Score and remove half of wrapper from each stick of frozen butter. Following photo at left, grate unwrapped ends on large holes of box grater (you should grate total of 8 tablespoons). Place grated butter in freezer until needed. Melt 2 tablespoons of remaining ungrated butter and set aside. Save remaining 6 tablespoons butter for another use. Place blueberries in freezer until needed.

 
2. Whisk together milk and sour cream in medium bowl; refrigerate until needed. Whisk flour, 1/2 cup sugar, baking powder, baking soda, salt, and lemon zest in medium bowl. Add frozen butter to flour mixture and toss with fingers until thoroughly coated.

3. Add milk mixture to flour mixture; fold with spatula until just combined. With rubber spatula, transfer dough to liberally floured work surface. Dust surface of dough with flour; with floured hands, knead dough 6 to 8 times, until it just holds together in ragged ball, adding flour as needed to prevent sticking.
 
4. Roll dough into approximate 12-inch square. Fold dough into thirds like a business letter, using bench scraper or metal spatula to release dough if it sticks to countertop. Lift short ends of dough and fold into thirds again to form approximate 4-inch square. Transfer dough to plate lightly dusted with flour and chill in freezer 5 minutes.
 
5. Transfer dough to floured work surface and roll into approximate 12-inch square again. Sprinkle blueberries evenly over surface of dough, then press down so they are slightly embedded in dough. Using bench scraper or thin metal spatula, loosen dough from work surface. Roll dough, pressing to form tight log. Lay seam-side down and press log into 12 by 4-inch rectangle. Using sharp, floured knife, cut rectangle crosswise into 4 equal rectangles. Cut each rectangle diagonally to form 2 triangles and transfer to parchment-lined baking sheet.

6. Brush tops with melted butter and sprinkle with remaining tablespoon sugar. Bake until tops and bottoms are golden brown, 18 to 25 minutes. Transfer to wire rack and let cool 10 minutes before serving.
 
To Make Ahead:  

After placing the scones on the baking sheet, either refrigerate them overnight or freeze. When ready to bake, for refrigerated scones, heat oven to 425 degrees and follow directions in step 6. For frozen scones, heat oven to 375 degrees, follow directions in step 6, and extend cooking time to 25 to 30 minutes.

Makes 8 scones

Fresh Corn Salad with Black Beans and Tomatoes


Here's another recipe made during our stay at the Cook's Country house in Vermont. If you're looking for a great side dish to bring to a BBQ or picnic, look no further: this salad is healthy, full of ingredients that you can buy right now at your local farm stand, and it's easy to make. I made it extra-summery by grilling the corn rather than boiling it as the original recipe called for. I also added avocado, because it just seemed to make sense with the other ingredients. Fresh corn and tomatoes are the stars here, so please don't use the canned kind. The leftovers make a great filling for quesadillas and omlettes!


Fresh Corn Salad with Black Beans and Tomatoes
adapted from The America's Test Kitchen Family Cookbook

Ingredients:
Dressing:
6 tablespoons extra-virgin olive oil
2 tablespoons fresh lime juice
1 tablespoon red wine vinegar
1 jalapeno chile, stemmed, seeded, and minced (leave a few seeds in if you want it a little spicy)
1 clove garlic, minced
1/2 teaspoon ground cumin
1/2 teaspoon table salt
1/4 teaspoon ground black pepper

Salad:
8 ears fresh corn , husks and silks removed
1 pint grape tomatoes or cherry tomatoes, halved
1 (15.5-ounce) can black beans, rinsed
6 scallions, sliced thin
1 avocado, diced
2 tablespoons minced fresh cilantro
Table salt and ground black pepper

Directions:

1. For the dressing: Shake all of the dressing ingredients together in a jar with a tight­fitting lid.

2. Grill corn over direct heat until a few black marks appear (about 4-5 minutes), rotating occasionally. (or: cook the corn in 6 quarts boiling water until tender, 5 to 7 minutes. Drain and rinse under cold water.) Cut the kernels from each cob into a large mixing bowl using a paring knife. Add the tomatoes, beans, scallions, cilantro, avocado, dressing and toss. Season with salt and pepper to taste and serve.

To Make Ahead:

This salad can be prepared, covered, and refrigerated a day in advance (do not add the avocado until ready to serve). Before serving, bring to room temperature and freshen with a squeeze of lime juice. Add avocado, season with salt and pepper to taste.

Serves 8
 
Download a printable recipe.

Summer Tomato Pie


I can't take credit for making this delicious creation: my friend Kate made it while we were on our Vermont vacation (I can only take credit for eating it). I never get tired of fresh tomatoes (especially when they're layered with cheese), so I plan to make this myself before the summer is over. Served at room temperature, a slice of this pie with a fresh green salad makes an excellent dinner on a steamy August evening.

Tip from Kate: I used store-bought dough and it took the pie about 35-40 minutes to cook once the temperature was reduced. Also, I felt the bottom crust could have been more distinct, so next time I’m planning on baking the bottom crust briefly before adding the filling in step 3.

Summer Tomato Pie
from Cook's Country

Note: Visit Cooks Country.com for our “Double Crust Pie Dough”, or use your own recipe or store bought dough. If using store bought dough, bake the pie for 30 minutes after turning down the heat in step 4.

Ingredients:
2 (9-inch) pie dough rounds (see note)
2 pounds beefsteak tomatoes (about 4 large), cored and cut into 1/4 inch slices
1/2 tsp salt
1/4 cup mayonnaise
4 tsp cornstarch
1 & 1/2 cups shredded sharp cheese
4 scallions sliced thin

Directions:
1. ROLL DOUGH – On lightly floured surface, roll 1 dough round into 12-inch circle (is using store-bought dough, you do not need to roll either crust. Transfer to 9-inch pie plate, letting excess hang over edge. Cover w/ plastic and refrigerate 30 minutes. Roll second round into 12-inch circle and refrigerate for 30 minutes.

2. DRAIN TOMATOES – Arrange tomatoes on paper towel-lined baking sheet and sprinkle w/ salt. Let drain 30 minutes, then press tomatoes with additional paper towels until very dry.

3. ASSEMBLE PIE – Adjust oven rack to lowest position, place empty rimmed baking sheet on rack, and heat oven to 450 degrees. Mix mayonnaise, cornstarch, and 1 cup cheese in bowl well combined. Sprinkle remaining cheese over bottom of dough-lined pie plate. Arrange third of tomatoes over cheese. Spread half of mayonnaise mixture over tomatoes and sprinkle with half of scallions. Layer with another third of the tomatoes, remaining mayonnaise mixture and remaining scallions, then w/ remaining tomatoes.

4. CRIMP CRUST – Arrange top crust on pie. Press crusts together, then trim, fold and crimp edges. Cut four 2-by 1- inch oval vent holes in top. Place pie on heated baking sheet, bake for 10 minutes, then lower oven temperature to 325 degrees and bake until crust is golden brown, about 40 minutes. Cool on wire rack for at least 3 hours. Serve at room temperature.
 
Yield: Serves 8

Download a printable recipe.

Vacation Photos

John and I are back from our food-themed trip to the Cook's Country farmhouse in Rupert, VT. We cooked some pretty amazing meals in the set kitchen (not the best photo, but you can see the studio lights on the ceiling). Can't you just picture Bridget and Chris cooking right here?


The kitchen conveniently contained pretty much every cookbook and magazine ever published by the Cook's Illustrated/America's Test Kitchen people.


We cooked dinner every night we stayed there, except for the evening we had dinner at American Flatbread in Burlington (delicious pizza and beer! I highly recommend if you're ever in northern Vermont!). My friend Kate, who is an excellent cook, made her famous ribs one night. I don't know her recipe, but I'm pretty sure she laces them with some kind of addictive chemicals because just looking at this picture makes me jones for these:


Kate also made a tomato pie. Not the pizza kind you're thinking of if you live anywhere near Trenton, NJ, but an actual pie crust filled with layers of cheese and fresh summer tomatoes (this was a Cook's Country recipe, appropriately enough):


John and I made our spicy honey-brushed chicken thighs one night, and I made this fresh corn, black bean, and tomato salad as a side dish (from the America's Test Kitchen Family Cookbook):


When we weren't busy cooking delicious things, we kept ourselves occupied by reading in rocking chairs on the wraparound porch....


...and playing in the huge backyard:


If you're looking for a relaxing New England getaway, I can't recommend this place highly enough. I'll be back soon with some of the recipes mentioned above!

Barbecued Chicken Kebabs


If you've been reading this blog for awhile, you know that John and I are huge fans of Cook's Illustrated. This recipe is a perfect example of why we adore them: in order to keep the chicken pieces moist while grilling, the recipe tells you to coat them with pureed bacon. Weird, yet brilliant.

Although pureeing bacon might have been the nastiest thing I've ever done with my food processor, the resulting kebabs were phenomenal. We used chicken thighs, as the recipe recommends, but you can use breasts if that's your thing (just don't use breasts and thighs on the same skewer since they cook at different rates). I totally dig the homemade barbecue sauce from this recipe, but you could easily sub your favorite bottled brand if you want to save some time. Just don't skip the bacon paste!

We cooked ours on our charcoal grill, but I'm including instructions for a gas grill as well. Tomorrow we're heading to Vermont to stay at the Cook's Country house (see the previous post for more info), so stay tuned for lots of fabulous photos and recipes from our stay.


Barbecued Chicken Kebabs
from Cook's Illustrated

Ingredients:

Sauce
1/2 cup ketchup
1/4 cup light or mild molasses
2 tablespoons grated onion
2 tablespoons Worcestershire sauce
2 tablespoons Dijon mustard
2 tablespoons cider vinegar
1 tablespoon light brown sugar

Kebabs
2 pounds boneless, skinless chicken thighs or breasts, trimmed of excess fat and cut into 1-inch cubes
2 teaspoons kosher salt
2 tablespoons sweet paprika
4 teaspoons sugar
2 teaspoons smoked paprika
2 slices bacon , cut into 1/2-inch pieces
4 12-inch metal skewers

Instructions:

1. FOR THE SAUCE: Bring all ingredients to simmer in small saucepan over medium heat; cook, stirring occasionally, until sauce reaches ketchup-like consistency and is reduced to about 1 cup, 5 to 7 minutes. Transfer 1/2 cup sauce to small bowl and set aside remaining sauce to serve with cooked chicken.

2. FOR THE KEBABS: Toss chicken and salt in large bowl; cover with plastic wrap and refrigerate for at least 30 minutes and up to 1 hour.

3. Charcoal grill: Light large chimney starter three-quarters filled with charcoal (4 1/2 quarts, about 75 briquettes) and allow to burn until coals are fully ignited and partially covered with thin layer of ash, about 20 minutes. Arrange all coals in even layer over half of grill bottom, leaving other half empty. Position cooking grate over coals, cover grill, and heat grate until hot, about 5 minutes. Scrape grate clean with grill brush. Gas grill: Turn all burners to high, close lid, and heat grill until hot, about 15 minutes. Scrape cooking grate clean with grill brush. Leave primary burner on high and turn off other burner(s).

4. While grill heats, pat chicken dry with paper towels. Combine sweet paprika, sugar, and smoked paprika in small bowl. Process bacon in food processor until smooth paste forms, 30 to 45 seconds, scraping down bowl twice during processing. Add bacon paste and spice mixture to chicken; mix with hands or rubber spatula until ingredients are thoroughly blended and chicken is completely coated. Thread meat onto skewers, rolling or folding meat as necessary to maintain 1-inch cubes.

5. Place kebabs over coals (or over the primary burner, if using gas) and grill, turning one-quarter turn every 2 to 2 1/2 minutes until well browned and slightly charred, 8 minutes for breasts or 10 minutes for thighs. (If flare-ups occur, slide kebabs to cool side of grill until fire dies down.) Brush top surface of kebabs with ¼ cup sauce; flip and cook until sauce is brown in spots, about 1 minute. Brush second side with remaining ¼ cup sauce; flip and continue to cook until brown in spots and instant-read thermometer inserted in center of meat registers 160 degrees for breasts and 175 degrees for thighs, about 1 minute longer. Remove kebabs from grill and let rest for 5 minutes. Serve, passing reserved barbecue sauce separately.

Serves 6.
 
Download a printable recipe.

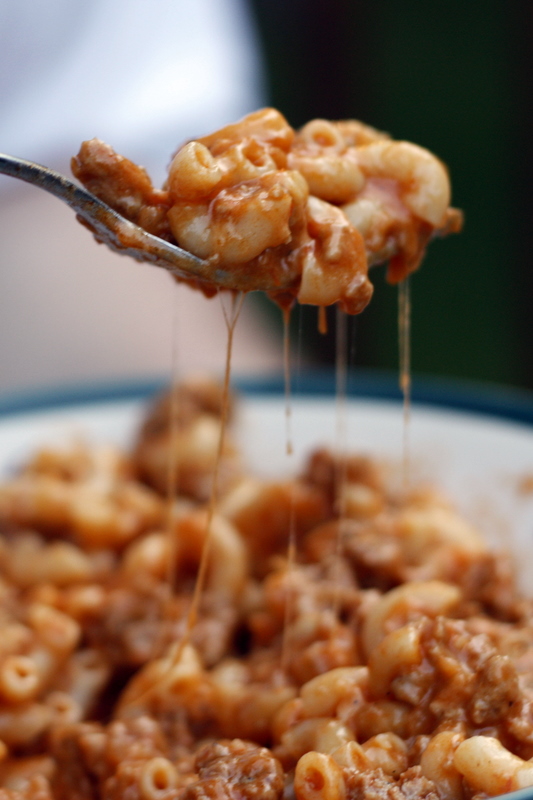
Cheesy Chili Mac


Lately I've developed a keen interest in all things Cook's Country. If you're not familiar with this show, it's the sister show to America's Test Kitchen on PBS (they also publish a magazine with recipes). It's filmed at a farmhouse in Vermont, and the show focuses on down-home American food. John discovered that you can rent out the farmhouse where the show is filmed, so guess who is taking a Vermont vacation next month? John and I and a few of our friends are headed up to the lovely Green Mountains to enjoy a week of relaxing, cooking, eating, hiking, and more eating! The house is stocked with pantry items, cookbooks, and all kinds of kitchen equipment (as you might expect), and we plan to take full advantage of it! It's a food blogger's wet dream, really.

In the meantime, I've been recording the show and keeping an eye out for tasty-looking Cook's Country recipes, like this one for cheesy chili mac. This one caught my eye because it looked easy enough to make on a weeknight (it was), it only required one skillet, and it's full of cheese. John and I liked this so much that there was only a tiny bit leftover for lunch the next day (and it was delicious reheated).


Cheesy Chili Mac
Adapted from Cook's Country, as seen on Tracey's Culinary Adventures

Ingredients:
1 tablespoon vegetable oil
1 medium onion, minced
1 tablespoon chili powder
1 tablespoon ground cumin
3 garlic cloves, minced
1 tablespoon brown sugar
1 pound ground turkey
2 cups water
1 15-oz can tomato sauce
8 oz (about 2 cups) elbow macaroni
1 1/2 -2 cups shredded Mexican cheese blend

Directions:
Set a 12-inch nonstick skillet over medium heat and add the oil. Heat until shimmering. Add the onion, chili powder, cumin, and 1/2 teaspoon salt to the pan. Cook, stirring frequently, until the onion has softened, about 5-7 minutes. Add the garlic and brown sugar and cook until fragrant, about 30 seconds. Add the ground turkey and cook until it is no longer pink.

Stir the water and tomato sauce into the ground turkey mixture in the pan. Add the pasta and stir to combine. Cover the pan and increase the heat to medium-high. Cook until the pasta is al dente, stirring frequently to prevent the pasta from sticking. Adjust the heat as necessary to maintain a vigorous simmer.

Turn off the heat under the pan and add 1 cup of the cheese. Stir to incorporate/melt then season the dish to taste with salt and pepper. Sprinkle remaining cheese (1/2 - 1 cup depending on how cheesy you want your dish) over the top and cover the pan again. Let stand for about 2 minutes, or until the cheese melts.
 
Makes 4 servings

mmm... melty
 Download a printable recipe.

Marbled-Chocolate Banana Bread

So I was going to make chocolate chip banana bread with the bunch of brown bananas sitting on my counter, but then Cooking Light posted a link to their best banana bread recipes on Facebook. And they had me at "marbled chocolate."

It's the same basic recipe as the chocolate chip bread, but instead of just throwing the chocolate chips in the batter, you melt them down, mix them with some batter, and then swirl the resulting chocolatey goodness into your bread. I made a few substitutions to the original recipe: I used white whole wheat flour in place of all purpose (so it's, um, healthy?), 2 eggs in place of the egg substitute, and vanilla yogurt in place of the regular.

The note on the Cooking Light recipe says to toast the bread, and smear it with peanut butter. Yes. Do this.

Marbled Chocolate Banana Bread
adapted from Cooking Light

Ingredients:
2 cups white whole wheat flour
3/4 teaspoon baking soda
1/2 teaspoon salt
1 cup sugar
1/4 cup butter, softened
1 1/2 cups mashed ripe banana (about 3 bananas)
2 eggs
1/3 cup vanilla low-fat yogurt
1/2 cup semisweet chocolate chips
Cooking spray

Directions:

Preheat oven to 350°.

Lightly spoon flour into dry measuring cups, and level with a knife. Combine the flour, baking soda, and salt, stirring with a whisk.

Place sugar and butter in a large bowl; beat with a mixer at medium speed until well blended (about 1 minute). Add banana, eggs, and yogurt; beat until blended. Add flour mixture; beat at low speed just until moist.

Place chocolate chips in a medium microwave-safe bowl, and microwave at HIGH 1 minute or until almost melted, stirring until smooth. Cool slightly. Add 1 cup batter to chocolate, stirring until well combined. Spoon chocolate batter alternately with plain batter into an 8 1/2 x 4 1/2-inch loaf pan coated with cooking spray. Swirl batters together using a knife. Bake at 350° for 1 hour and 15 minutes or until a wooden pick inserted in center comes out clean. Cool 10 minutes in pan on a wire rack; remove from pan. Cool completely on wire rack.

Yield: 1 loaf


Download a Printable Recipe

Chicken Involtini with Prosciutto and Basil

Grilled chicken breasts don't hold a lot of appeal for me... if I'm going to bust out the grill (ok, if John is going to bust out the grill), I want something a little more interesting than a bland old chicken breast. These chicken breasts, however, are totally not boring. They are stuffed with prosciutto, cheese, and basil, making them something special. Special enough for company, in fact... it was such a gorgeous day yesterday that we invited our friends over to enjoy some grilling and leisurely wine-sipping on the deck. Maybe it was the wine, but we all really loved these.

The only thing I would do differently the next time I make these is add more cheese! Only one slice is used per chicken breast, which seems a little skimpy. You need at least two in there. Also the grilling time called for in the recipe was 12 minutes... ours took over 20. I'm not sure if it was something with our grill or if I didn't pound the chicken flat enough, but be sure to test yours so as not to give your friends and family salmonella. We did the cut-it-open-and-see-if-it's-pink test, but an instant read thermometer would work too.

Chicken Involtini with Prosciutto and Basil
from Weber's Way to Grill

Ingredients:
4 boneless, skinless chicken breast halves, about 8 oz each
1 teaspoon kosher salt
1 teaspoon garlic powder
1/2 teaspoon freshly ground black pepper
4 very thin slices prosciutto
4 thin slices provolone cheese, halved
8 large basil leaves, plus more for garnish
Extra-virgin olive oil
2 cups good-quality tomato sauce

Directions:
1. Prepare the grill for direct cooking over medium heat.

2. For each piece of chicken, use about 12 inches of plastic wrap. Place the chicken, smooth side down, to one side of the plastic, about 2 inches from the edge. Fold the remaining plastic over the chicken leaving an inch or so from the folded edge. This will allow the chicken to spread out as it gets thinner. Starting from the thick side, gently pound the chicken with the flat side of a tenderizer or the bottom of a small, heavy skillet, moving to different areas with every stroke until it is about 1/4 inch thick and just about double in size. Do not pound too hard or the chicken might break apart.


3. Season each piece of chicken on both sides with the salt, garlic powder, and pepper. Arrange the chicken with the smooth side down on a work surface.

4. Lay a slice of prosciutto on each piece of chicken. Then lay down 2 halves of the provolone and then 2 basil leaves. Carefully roll up the chicken, keeping it snug as you work. Tie 2 pieces of butcher's twine around each piece to keep it together. Trim the loose ends of twine. Lightly brush each rolled piece of chicken with the oil.


5. Brush the cooking grates clean. Grill the chicken over direct medium heat, with the lid closed as much as possible, until golden on all sides, about 12 minutes, turning a quarter turn every 3 minutes. Remove from the grill and let rest for 3 to 5 minutes. Meanwhile, in a small saucepan over medium-high heat, warm the tomato sauce.

6. Remove the twine from the chicken pieces, cut into slices, and serve warm in a pool of sauce. Garnish with torn pieces of basil.

Serves 4


Download a printable recipe.

Chicken Fried Steak!


This is so good that it totally deserves the exclamation point! I make a lot of Italian themed dishes and all of them are arguably my favorite meal depending on my mood.  This is probably my favorite thing I've ever made that didn't involve tomatoes.  I've had chicken fried steak only a few times, and living in NJ and not Texas, it's hard to find restaurants that actually make it homemade.  Apparently Texas restaurants serve over 800,000 chicken fried steak orders every day!  Needless to say, our next trip to Austin is going to include a chicken fried steak dinner.  So knowing what this dish should taste like, and not what I've eaten in local diners, I set out to find a few recipes.

There were several that looked good, but I settled on a tried and true recipe from our friends at Cooks Illustrated.  Instead of using 6 small steaks, we used 2 good sized steaks, maybe 8 or 10 oz each, but kept the measurements of everything else the same.  This allowed me to use a bit more batter on the steaks, a very good thing.  Being bigger steaks, we cooked them one at a time, much easier this way I think. Another change we made to the recipe was we used a vegetable/corn oil blend instead of peanut oil.  They didn't have peanut oil at the grocery store, and we didn't see the need to track it down just for this recipe.  

As you can see, we served this with some delicious mashed potatoes and Bec's fluffy biscuits.

Tip: definitely use a dutch oven to cook these in. I used our trusty 12 inch cast iron skillet, and it got a little messy. If we had a gas cooktop, we'd probably be posting about a kitchen fire and not chicken friend steak.

Ingredients:
Steak
- 3 cups unbleached all-purpose flour
- 1/8 tsp cayenne pepper
- 1 large egg
- 1 tsp baking powder
- 1/2 tsp baking soda
- 1 cup buttermilk
- 6 cube steaks , about 5 ounces each, pounded to 1/3 inch thickness
- 4 cups peanut oil (or enough to come up an inch in your dutch oven)

Cream Gravy
- 1 medium onion , minced
- 1/8 tsp dried thyme
- 2 cloves garlic , minced or pressed through a garlic press
- 3 Tbs unbleached all-purpose flour
- 1/2 cup low-sodium chicken broth
- 2 cups whole milk
- 3/4 tsp table salt
- 1/4 tsp ground black pepper
- Cayenne pepper

Instructions:

1. For the steaks: Measure the flour, 5 teaspoons salt, 1 teaspoon black pepper, and cayenne into a large shallow dish. In a second large shallow dish, beat the egg, baking powder, and baking soda; stir in the buttermilk (the mixture will bubble and foam).

2. Set a wire rack over a rimmed baking sheet. Pat the steaks dry with paper towels and sprinkle each side with salt and pepper to taste. Drop the steaks into the flour and shake the pan to coat. Shake excess flour from each steak, then, using tongs, dip the steaks into the egg mixture, turning to coat well and allowing the excess to drip off. Coat the steaks with flour again, shake off the excess, and place them on the wire rack.

3. Adjust an oven rack to the middle position, set a second wire rack over a second rimmed baking sheet, and place the sheet on the oven rack; heat the oven to 200 degrees. Line a large plate with a double layer of paper towels. Meanwhile, heat 1 inch of oil in a large (11-inch diameter) Dutch oven over medium-high heat to 375 degrees. Place three steaks in the oil and fry, turning once, until deep golden brown on each side, about 5 minutes (oil temperature will drop to around 335 degrees). Transfer the steaks to the paper towel-lined plate to drain, then transfer them to the wire rack in the oven. Bring the oil back to 375 degrees and repeat the cooking and draining process (use fresh paper towels) with the three remaining steaks.

4. For the gravy: Carefully pour the hot oil through a fine-mesh strainer into a clean pot. Return the browned bits from the strainer along with 2 tablespoons of frying oil back to the Dutch oven. Turn the heat to medium, add the onion and thyme, and cook until the onion has softened and is beginning to brown, 4 to 5 minutes. Add the garlic and cook until aromatic, about 30 seconds. Add the flour to the pan and stir until well combined and starting to dissolve, about 1 minute. Whisk in the broth, scraping any browned bits off the bottom of the pan. Whisk in the milk, salt, pepper, and cayenne; bring to a simmer over medium-high heat. Cook until thickened (gravy should have a loose consistency—it will thicken as it cools), about 5 minutes.

5. Transfer the chicken-fried steaks to individual plates. Spoon a generous amount of gravy over each steak. Serve immediately, placing any remaining gravy in a small bowl.


Download a printable recipe here.

Creamy Goat Cheese Pasta with Roasted Asparagus

I had a subscription to Everyday Food several years ago, and this is the one recipe that I've saved and made over and over again. Whenever spring rolls around and I start seeing asparagus on sale at the grocery store, I immediately think of this recipe. It's a snap to make... you combine the goat cheese and a little butter with hot pasta cooking water to make a creamy, no-cook sauce. Then toss it with your pasta and roasted asparagus. Easy peasy.

I usually leave out the chive garnish, just to make this that much easier. John, however, prefers to add crumbled bacon. Do what you will, but please don't make the same mistake I did the first time I cooked this: the recipe says to reserve 1 1/2 cups of the pasta cooking water, but then instructs you to only put 1/2 cup in the sauce (and add the rest incrementally, if needed). Since I often fail at reading directions, I dumped in the entire cup and half of water. The sauce was a little thin, to say the least. 


Creamy Goat Cheese Pasta with Roasted Asparagus
from Everyday Food

Ingredients:

2 bunches asparagus (2 pounds total), tough ends removed
4 tablespoons butter, cut into small pieces
12 ounces cavatappi or other short pasta
1 small log soft goat cheese (5 ounces), crumbled
2 to 3 tablespoons snipped fresh chives, for garnish

Directions:
 
1.Preheat oven to 450 degrees. Bring a large pot of water to a boil for pasta. Place asparagus on a large rimmed baking sheet; dot with 1 tablespoon butter, and season with salt and pepper. Roast until tender, tossing occasionally, 10 to 15 minutes; cut into 2-inch lengths.

2.While asparagus is roasting, generously salt boiling water. Add pasta, and cook until al dente, according to package instructions. Set aside 1 1/2 cups pasta water; drain pasta and return to pot.

3.In a medium bowl, combine goat cheese, remaining 3 tablespoons butter, and 1/2 cup pasta water. Season with salt and pepper, and whisk until smooth. Add goat-cheese mixture and asparagus to pasta; toss to combine, adding more pasta water if necessary for sauce to coat pasta. Serve pasta garnished with chives.

Serves 4

Download a printable recipe.

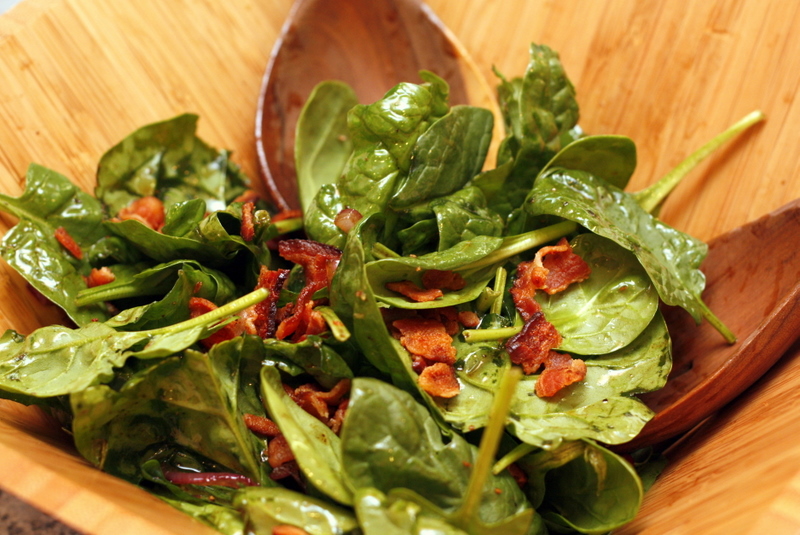
Wilted Spinach Salad with Bacon and Balsamic Vinaigrette

 
This might sound weird if you've never had a warm salad before, but I promise the spinach really holds up well to the warm dressing (dressing made with bacon fat, by the way). I'm just going to let the bacon convince you. Bacon bacon bacon. Just try it. It's really a very simple recipe without a lot of ingredients (no hard boiled eggs here... why does it seem like every spinach salad has to have those??). The recipe says it serves four as a first course, but John and I took down the whole salad as a side dish to our steak dinner.

Wilted Spinach Salad with Bacon and Balsamic Vinaigrette
from Cook's Illustrated

Ingredients:
5 ounces baby spinach (about 6 cups)
2 slices bacon (about 2 ounces), cut into 1/4 inch pieces
1 tablespoon extra virgin olive oil
1/2 small red onion, minced (about 1/2 cup)
1/4 teaspoon table salt
1/8 teaspoon ground black pepper
1/8 teaspoon granulated sugar
1 tablespoon balsamic vinegar

Directions:
Place spinach in large bowl. Fry bacon in small skillet over medium heat until crisp, about 5 minutes; transfer with slotted spoon to paper-towel lined plate, leaving fat in skillet. Return skillet to medium heat and add oil, onion, salt, pepper, and sugar. Cook, stirring occasionally, until onion is slightly softened, 2 to 3 minutes. Add vinegar; swirl to incorporate. Pour warm dressing over spinach and toss gently to wilt. Sprinkle bacon over spinach; serve immediately.

Download a printable recipe.

Slow Cooker Bolognese Sauce


My slow cooker is an appliance that I really, really want to like, but it constantly disappoints me. Almost everything I've made in it has been completely underwhelming. So, when the America's Test Kitchen people came out with their new cookbook, Slow Cooker Revolution, I knew they'd be able to improve my relationship with the slow cooker. This recipe for bolognese sauce was definitely a good start. I've never made a traditional bolognese, but this was just as flavorful as anything I've had at a restaurant (and John couldn't get enough of it, so it's Italian-approved).

The folks at America's Test Kitchen always come up with creative ways to solve common cooking dilemmas, and this recipe is no exception. To prevent the meat from drying out during the long cooking time, they mix it with a panade of bread and cream before putting it in the slow cooker. The recipe (which I am posting as written) calls for meatloaf mix, but I ended up using a mix of ground beef and pork. I also ended up adding quite a bit of salt once this was done cooking, so next time I will probably add more than the recommended 1/2 teaspoon to the meat mixture before it goes in the crock pot.

I think the appeal of the slow cooker for many people is the time-saving element. On that end, this recipe does take some prep work (chopping and sauteing vegetables), so it might not be an ideal weeknight recipe. However, this recipe saves you time in that it makes a huge batch of sauce: enough to sauce three pounds of pasta! So, you can make it on the weekend and freeze the rest for a busy night. I know John and I are looking forward to eating these leftovers!

Big-Batch Bolognese Sauce
from Slow Cooker Revolution

Note: You will need a 6 quart slow-cooker for this recipe.

Ingredients:
3 tablespoons unsalted butter
1 onion, minced
1 carrot, peeled and minced
1/4 cut minced celery
1/4 cup tomato paste
3 garlic cloves, minced
1 teaspoon minced fresh thyme or 1/4 teaspoon dried
1/2 cup dry white wine
2 (28 oz) cans crushed tomatoes
3 slices high-quality white sandwich bread, torn into quarters
1 cup heavy cream
3 pounds meatloaf mix
Salt and pepper

Directions:
1. Melt the butter in 12-inch skillet over medium-high heat. Add onion, carrot, celery, tomato paste, garlic, and thyme and cook until vegetables are softened and lightly browned, 8 to 10 minutes. Stir in wine, scraping up any browned bits; transfer to slow cooker. Stir tomatoes into slow cooker.

2. Mash bread and heavy cream into a paste in large bowl using fork. Mix in meatloaf mix, 1/2 teaspoon salt, and 1/2 teaspoon pepper using hands. Stir meatloaf mixture into slow cooker, breaking up any large pieces. Cover and cook until beef is tender, 9 to 11 hours on low or 5 to 7 hours on high.

3. Let sauce settle for 5 minutes, then remove fat from surface using a large spoon. Break up any remaining large pieces of meat with spoon. Season with salt and pepper to taste.

Yield: 14 cups

Download a printable recipe.

Chocolate Peanut Butter Crunch Bars


If Anthony Bourdain were judging these bars on Top Chef, I'm pretty sure he'd call them "perfect stoner food." Because these are basically Rice Krispie treats on crack. The bottom layer is Rice Krispies, pretzels, and marshmallow, topped with a peanut butter layer, then topped with a chocolate layer. And see all that crushed goodness on top? Crushed peanuts and pretzels. Awesome.

I've made these twice since John's sister-in-law, Brooke, posted these on her blog a few weeks ago.  These are so good that John, myself, and two of our friends managed to take down a whole pan in one sitting. Just try to resist the salty, sweet, chewy, crunchy, peanutty goodness and eat only one. It cannot be done.  


Chocolate Peanut Butter Crunch Bars

Ingredients:
1/4  cup dry-roasted peanuts
3 cups mini pretzel twists (about 1 2/3 cups coarsely crushed), divided
3 cups crisp rice cereal
3/4 cup butter (1 1/2 sticks), divided       
1 bag (10.5 oz) miniature marshmallows
1/2 cup light corn syrup, divided
1 bag (10 oz)  peanut butter morsels
1 cup semi-sweet chocolate morsels


Directions:
 
1. Coarsely chop peanuts; set aside. Place pretzels into large resealable plastic bag; coarsely crush using a meat mallet or rolling pin. Set aside 1/3 cup of the pretzels. Place remaining pretzels and cereal in a large mixing bowl.

2. Place 6 tbsp of the butter in a microwave-safe bowl. Microwave on HIGH 60-90 seconds or until melted. Add marshmallows; microwave on HIGH 60-90 seconds. Stir until marshmallows are completely melted. Immediately add marshmallow mixture to mixing bowl; mix well. Spread crust evenly in a 13"x9" pan; firmly press into pan.

3. Combine 2 tbsp of the butter and half of the corn syrup in a microwave-safe bowl. Microwave, uncovered, on HIGH 60-90 seconds or until melted, stirring every 30 seconds. Stir in peanut butter morsels; mix until melted (mixture will be stiff). Spread peanut butter mixture over crust using an offset spatula.

4. For ganache, place remaining butter and corn syrup in a microwave-safe bowl. Microwave on HIGH 60-90 seconds or until melted. Stir in chocolate morsels; mix until smooth. Spread ganache evenly over peanut butter mixture. Sprinkle with peanuts and reserved pretzels. Place in freezer 5-10 minutes or until ganache is set. Cut into 24 squares; cut squares in half.

Yield: 24 servings

Chicken Piccata with Lemony Orzo


So, John's aunt has been nagging gently reminding us to update our blog, and she's right... we're slackers. So, this one's for you, Linda. This recipe is from the November 2010 issue of Cooking Light, and I've made it a few times since getting the issue in the mail. Chicken piccata (or, "chicken picante" as John's dad calls it) is a pan-seared chicken breast served with a lemon-caper sauce. And this particular version is quick, easy, and healthy. It's a good weeknight dinner for these reasons, and also because you can take out your workday frustrations by pounding your chicken into cutlets (and drinking the rest of the wine that you don't put in the sauce).

Plus, it's Penny-approved:


Chicken Piccata with Lemony Orzo
from Cooking Light

Ingredients:
1 cup uncooked orzo
2 tsp grated lemon rind
4 (4 oz) chicken cutlets
1/4 tsp kosher salt
1/4 tsp black pepper
1 tbs olive oil
1/4 cup white wine
1/2 cup low-sodium chicken broth
1 tbs fresh lemon juice
1 tbs chilled butter, cut into small pieces
2 tbs chopped fresh parsley
1 tbs capers

Directions:
1. Cook orzo according to package directions. Drain. Stir in rind.

2. While orzo cooks, heat a large skillet over medium-high heat. Sprinkle chicken with salt and pepper. Add oil to pan; swirl to coat. Add chicken; cook 3 minutes on each side or until done. Remove from pan; keep warm. Add wine; cook 1 minute or until liquid almost evaporates, scraping pan to loosen browned bits. Add broth and lemon juice; bring to a boil. Cook 2 minutes or until reduced to 1/2 cup.

3. Remove from heat; add butter, stirring until butter melts. Stir in parsley and capers. Serve over orzo.

Yield: 4 servings

Download a printable recipe.

Spicy Honey-Brushed Chicken Thighs


So... how are those New Year's resolutions coming along? Uh, yeah... me too. If you want a quick, healthy, and tasty dinner to get you back on track, give this recipe a try. True, chicken thighs are not quite as lean as the breasts, but they're still quite healthy and they have a lot more flavor. And if saving money was one of your resolutions: chicken thighs are cheaper than the breasts, too.

John and I have made these a bunch of times, but somehow they've never made it to the blog. It's a quick and easy recipe... all you have to do is brush the spice rub on the chicken, broil for a few minutes, and then brush on the glaze (and you know I love a good glaze). These have that great sweet and spicy combo, but they're not too hot. We had ours with some green beans and Trader Joe's Harvest Grains.

P.S. We're on Twitter now, so follow us here, or click the button on the right. We'll be tweeting all sorts of delicious things. And by "we", I mean John, since I have virtually no understanding of how it works.

Spicy Honey-Brushed Chicken Thighs
from Cooking Light

Ingredients:

2  teaspoons  garlic powder
2  teaspoons  chili powder
1  teaspoon  salt
1  teaspoon  ground cumin
1  teaspoon  paprika
1/2  teaspoon  ground red pepper
8  skinless, boneless chicken thighs
Cooking spray
6  tablespoons  honey
2  teaspoons  cider vinegar

Directions:

1. Preheat broiler.

2. Combine first 6 ingredients in a large bowl. Add chicken to bowl; toss to coat. Place chicken on a broiler pan coated with cooking spray. Broil chicken 5 minutes on each side.

3. Combine honey and vinegar in a small bowl, stirring well. Remove chicken from oven; brush 1/4 cup honey mixture on chicken. Broil 1 minute. Remove chicken from oven and turn over. Brush chicken with remaining honey mixture. Broil 1 additional minute or until chicken is done.

Yield: 4 servings (serving size: 2 chicken thighs)

Download a printable recipe

Cast Iron Skillet Deep Dish Pizza


Last week I got a craving for some deep dish pizza, which is understandable because all I ever make is Trenton style thin crust pizza. I didn't have a recipe but I knew I wanted Chicago style deep dish and I wanted to cook it in our trusty cast iron skillet.  I looked around a little bit to see if I could find a secret recipe from Lou Malnati's somewhere, but of course there was none to be found.  So I found my way over to the greatest cooking site on the planet, cooksillustrated.com.  They had just updated their Chicago style deep dish pizza recipe last year, so I knew I could count on them, as per usual. Their recipe makes two 9 inch pizzas, but I wanted to use my 12 inch skillet, no big deal, I'll just make one large dough ball and one small dough ball.  They also list their own tomato sauce recipe, but that's silly since I make my own tomato sauce and always have it on hand.  Although, their recipe looks good and I wouldn't mind if you used it.  Now let's talk about the crust on this pizza.  Chicago style deep dish pizza has a buttery, biscuit-like crust, and that was the most important thing i wanted to get right with this pie.  The key to this is laminating the dough.  What is laminated dough you say? Well you get it when you press together alternating layers of butter and dough.  Mmmm...butter.  As you can see, it makes for a flaky, pastry like crust that holds up well to all the cheese and sauce.  Go ahead and try this recipe tonight, you won't be disappointed.


Ingredients
Dough
3 1/4 cups (16 1/4 ounces) unbleached all-purpose flour
1/2 cup (2 3/4 ounces) yellow cornmeal
1 1/2 teaspoons table salt
2 teaspoons sugar
1 package instant or rapid-rise yeast
1 1/4 cups water (10 ounces), room temperature
3 tablespoons unsalted butter , melted, plus 4 tablespoons, softened
1 teaspoon plus 3 tablespoons olive oil

Toppings
3/4 pound mozzarella cheese
1/4 cup grated Parmesan (or Pecorino Romano, your choice) cheese
Pepperoni slices (or other toppings of your choice)
About 2 1/2 to 3 cups of your favorite tomato sauce
Fresh basil leaves

Instructions
1. FOR THE DOUGH: Mix flour, cornmeal, salt, sugar, and yeast in bowl of stand mixer fitted with dough hook on low speed until incorporated, about 1 minute. Add water and melted butter and mix on low speed until fully combined, 1 to 2 minutes, scraping sides and bottom of bowl occasionally. Increase speed to medium and knead until dough is glossy and smooth and pulls away from sides of bowl, 4 to 5 minutes. (Dough will only pull away from sides while mixer is on. When mixer is off, dough will fall back to sides.)

2. Using fingers, coat large bowl with 1 teaspoon olive oil, rubbing excess oil from fingers onto blade of rubber spatula. Using oiled spatula, transfer dough to bowl, turning once to oil top; cover tightly with plastic wrap. Let rise at room temperature until nearly doubled in volume, 45 to 60 minutes.

3. TO LAMINATE THE DOUGH: Using rubber spatula, turn dough out onto dry work surface and roll into 15- by 12-inch rectangle.  Using offset spatula, spread softened butter over surface of dough, leaving 1/2-inch border along edges.  Starting at short end, roll dough into tight cylinder. With seam side down, flatten cylinder into 18- by 4-inch rectangle. Cut about 1/4 of the rectangle crosswise. (This small ball can be used for another small pizza. Just flatten into a disc, wrap tightly in plastic, and throw it in the freezer.)

Working with the bigger ball, fold into thirds like a business letter; pinch seams together to form ball.  Return ball to oiled bowl, cover tightly with plastic wrap, and let rise in refrigerator until nearly doubled in volume, 40 to 50 minutes, or up to 6 hours. If you're going to use it another day, wrap tightly in plastic and freeze immediately.


4. Coat the skillet with 3 tablespoons olive oil. Transfer the dough ball to dry work surface and roll out into 15-inch disk about 1/4 inch thick. Transfer dough to pan by rolling dough loosely around rolling pin and unrolling into pan. Lightly press dough into pan, working into corners and 1 inch up sides. If dough resists stretching, let it relax 5 minutes before trying again.

5. Cut the mozzarella into strips and spread evenly over surface of dough.  Add the pepperoni (or other toppings) on top of the cheese.

Spread about 2 1/2 cups tomato sauce over cheese and sprinkle the Parmesan over sauce. Bake until crust is golden brown, 20 to 30 minutes. Remove pizza from oven, top with basil leaves, and let rest at least 10 minutes (preferably 20) before slicing and serving.  Enjoy!  Serves 2-3 people


Download a printable recipe here!
.

Skillet Carbonara Casserole


We decided to take a snow day today, even though we really didn't get more than 6 inches. I mean, who wants to wake up and shovel snow at 7am? So after Bec made me some delicious pancakes (another future blog post), I decided to stop being lazy with this blog and put up some delicious recipes we've made recently.  My parents came over for a weeknight meal a few weeks ago, and this Skillet Carbonara Casserole from Cooks Country was a hit!  It has all the delicious flavors of a spaghetti carbonara but it's a heck of a lot easier to make all in one skillet.  We served it with my tasty Balls of Meat and a salad, and it made for a hearty meal. This recipe will definitely be in regular rotation.

Ingredients:
8 slices  bacon , chopped fine
2 slices  hearty white sandwich bread , torn into pieces
1 1/4 cups  grated Pecorino Romano  
Salt and pepper
2 large  eggs
1 cup  evaporated milk
5 1/4 cups  water
3 garlic cloves , minced
1 cup  white wine
1 pound  penne pasta


Directions:
1. FRY BACON Cook bacon in large nonstick skillet over medium-high heat until crisp, about 5 minutes. Transfer bacon to paper towel-lined plate. Pour off fat from pan, reserving 3 tablespoons.

2. PREPARE TOPPING Pulse bread, ¼ cup cheese, ½ teaspoon pepper, one-quarter of crisp bacon, and 2 tablespoons reserved bacon fat in food processor until coarsely ground. Whisk eggs, milk, remaining cheese, and ¾ cup water in medium bowl.

3. SIMMER PASTA Heat remaining bacon fat in empty skillet over medium-high heat until shimmering. Add garlic and 1 teaspoon pepper and cook until fragrant, about 30 seconds. Stir in wine and cook until reduced to ¼ cup, about 3 minutes. Stir in remaining water, penne, and ¾ teaspoon salt and bring to boil. Reduce heat to medium and simmer covered, stirring occasionally, until most of liquid is absorbed and pasta is al dente, 15 to 20 minutes. Adjust oven rack to upper-middle position and heat broiler.

4. ADD SAUCE Off heat, add egg mixture and remaining crisp bacon to pan and toss to combine. Top with bread-crumb mixture and broil until golden brown, about 2 minutes. Cool 5 minutes. Serve.

Download a printable recipe here!
.