Spicy Honey-Brushed Chicken Thighs


So... how are those New Year's resolutions coming along? Uh, yeah... me too. If you want a quick, healthy, and tasty dinner to get you back on track, give this recipe a try. True, chicken thighs are not quite as lean as the breasts, but they're still quite healthy and they have a lot more flavor. And if saving money was one of your resolutions: chicken thighs are cheaper than the breasts, too.

John and I have made these a bunch of times, but somehow they've never made it to the blog. It's a quick and easy recipe... all you have to do is brush the spice rub on the chicken, broil for a few minutes, and then brush on the glaze (and you know I love a good glaze). These have that great sweet and spicy combo, but they're not too hot. We had ours with some green beans and Trader Joe's Harvest Grains.

P.S. We're on Twitter now, so follow us here, or click the button on the right. We'll be tweeting all sorts of delicious things. And by "we", I mean John, since I have virtually no understanding of how it works.

Spicy Honey-Brushed Chicken Thighs
from Cooking Light

Ingredients:

2  teaspoons  garlic powder
2  teaspoons  chili powder
1  teaspoon  salt
1  teaspoon  ground cumin
1  teaspoon  paprika
1/2  teaspoon  ground red pepper
8  skinless, boneless chicken thighs
Cooking spray
6  tablespoons  honey
2  teaspoons  cider vinegar

Directions:

1. Preheat broiler.

2. Combine first 6 ingredients in a large bowl. Add chicken to bowl; toss to coat. Place chicken on a broiler pan coated with cooking spray. Broil chicken 5 minutes on each side.

3. Combine honey and vinegar in a small bowl, stirring well. Remove chicken from oven; brush 1/4 cup honey mixture on chicken. Broil 1 minute. Remove chicken from oven and turn over. Brush chicken with remaining honey mixture. Broil 1 additional minute or until chicken is done.

Yield: 4 servings (serving size: 2 chicken thighs)

Download a printable recipe

Cast Iron Skillet Deep Dish Pizza


Last week I got a craving for some deep dish pizza, which is understandable because all I ever make is Trenton style thin crust pizza. I didn't have a recipe but I knew I wanted Chicago style deep dish and I wanted to cook it in our trusty cast iron skillet.  I looked around a little bit to see if I could find a secret recipe from Lou Malnati's somewhere, but of course there was none to be found.  So I found my way over to the greatest cooking site on the planet, cooksillustrated.com.  They had just updated their Chicago style deep dish pizza recipe last year, so I knew I could count on them, as per usual. Their recipe makes two 9 inch pizzas, but I wanted to use my 12 inch skillet, no big deal, I'll just make one large dough ball and one small dough ball.  They also list their own tomato sauce recipe, but that's silly since I make my own tomato sauce and always have it on hand.  Although, their recipe looks good and I wouldn't mind if you used it.  Now let's talk about the crust on this pizza.  Chicago style deep dish pizza has a buttery, biscuit-like crust, and that was the most important thing i wanted to get right with this pie.  The key to this is laminating the dough.  What is laminated dough you say? Well you get it when you press together alternating layers of butter and dough.  Mmmm...butter.  As you can see, it makes for a flaky, pastry like crust that holds up well to all the cheese and sauce.  Go ahead and try this recipe tonight, you won't be disappointed.


Ingredients
Dough
3 1/4 cups (16 1/4 ounces) unbleached all-purpose flour
1/2 cup (2 3/4 ounces) yellow cornmeal
1 1/2 teaspoons table salt
2 teaspoons sugar
1 package instant or rapid-rise yeast
1 1/4 cups water (10 ounces), room temperature
3 tablespoons unsalted butter , melted, plus 4 tablespoons, softened
1 teaspoon plus 3 tablespoons olive oil

Toppings
3/4 pound mozzarella cheese
1/4 cup grated Parmesan (or Pecorino Romano, your choice) cheese
Pepperoni slices (or other toppings of your choice)
About 2 1/2 to 3 cups of your favorite tomato sauce
Fresh basil leaves

Instructions
1. FOR THE DOUGH: Mix flour, cornmeal, salt, sugar, and yeast in bowl of stand mixer fitted with dough hook on low speed until incorporated, about 1 minute. Add water and melted butter and mix on low speed until fully combined, 1 to 2 minutes, scraping sides and bottom of bowl occasionally. Increase speed to medium and knead until dough is glossy and smooth and pulls away from sides of bowl, 4 to 5 minutes. (Dough will only pull away from sides while mixer is on. When mixer is off, dough will fall back to sides.)

2. Using fingers, coat large bowl with 1 teaspoon olive oil, rubbing excess oil from fingers onto blade of rubber spatula. Using oiled spatula, transfer dough to bowl, turning once to oil top; cover tightly with plastic wrap. Let rise at room temperature until nearly doubled in volume, 45 to 60 minutes.

3. TO LAMINATE THE DOUGH: Using rubber spatula, turn dough out onto dry work surface and roll into 15- by 12-inch rectangle.  Using offset spatula, spread softened butter over surface of dough, leaving 1/2-inch border along edges.  Starting at short end, roll dough into tight cylinder. With seam side down, flatten cylinder into 18- by 4-inch rectangle. Cut about 1/4 of the rectangle crosswise. (This small ball can be used for another small pizza. Just flatten into a disc, wrap tightly in plastic, and throw it in the freezer.)

Working with the bigger ball, fold into thirds like a business letter; pinch seams together to form ball.  Return ball to oiled bowl, cover tightly with plastic wrap, and let rise in refrigerator until nearly doubled in volume, 40 to 50 minutes, or up to 6 hours. If you're going to use it another day, wrap tightly in plastic and freeze immediately.


4. Coat the skillet with 3 tablespoons olive oil. Transfer the dough ball to dry work surface and roll out into 15-inch disk about 1/4 inch thick. Transfer dough to pan by rolling dough loosely around rolling pin and unrolling into pan. Lightly press dough into pan, working into corners and 1 inch up sides. If dough resists stretching, let it relax 5 minutes before trying again.

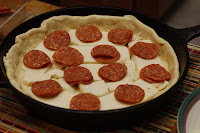
5. Cut the mozzarella into strips and spread evenly over surface of dough.  Add the pepperoni (or other toppings) on top of the cheese.

Spread about 2 1/2 cups tomato sauce over cheese and sprinkle the Parmesan over sauce. Bake until crust is golden brown, 20 to 30 minutes. Remove pizza from oven, top with basil leaves, and let rest at least 10 minutes (preferably 20) before slicing and serving.  Enjoy!  Serves 2-3 people


Download a printable recipe here!
.

Skillet Carbonara Casserole


We decided to take a snow day today, even though we really didn't get more than 6 inches. I mean, who wants to wake up and shovel snow at 7am? So after Bec made me some delicious pancakes (another future blog post), I decided to stop being lazy with this blog and put up some delicious recipes we've made recently.  My parents came over for a weeknight meal a few weeks ago, and this Skillet Carbonara Casserole from Cooks Country was a hit!  It has all the delicious flavors of a spaghetti carbonara but it's a heck of a lot easier to make all in one skillet.  We served it with my tasty Balls of Meat and a salad, and it made for a hearty meal. This recipe will definitely be in regular rotation.

Ingredients:
8 slices  bacon , chopped fine
2 slices  hearty white sandwich bread , torn into pieces
1 1/4 cups  grated Pecorino Romano  
Salt and pepper
2 large  eggs
1 cup  evaporated milk
5 1/4 cups  water
3 garlic cloves , minced
1 cup  white wine
1 pound  penne pasta


Directions:
1. FRY BACON Cook bacon in large nonstick skillet over medium-high heat until crisp, about 5 minutes. Transfer bacon to paper towel-lined plate. Pour off fat from pan, reserving 3 tablespoons.

2. PREPARE TOPPING Pulse bread, ¼ cup cheese, ½ teaspoon pepper, one-quarter of crisp bacon, and 2 tablespoons reserved bacon fat in food processor until coarsely ground. Whisk eggs, milk, remaining cheese, and ¾ cup water in medium bowl.

3. SIMMER PASTA Heat remaining bacon fat in empty skillet over medium-high heat until shimmering. Add garlic and 1 teaspoon pepper and cook until fragrant, about 30 seconds. Stir in wine and cook until reduced to ¼ cup, about 3 minutes. Stir in remaining water, penne, and ¾ teaspoon salt and bring to boil. Reduce heat to medium and simmer covered, stirring occasionally, until most of liquid is absorbed and pasta is al dente, 15 to 20 minutes. Adjust oven rack to upper-middle position and heat broiler.

4. ADD SAUCE Off heat, add egg mixture and remaining crisp bacon to pan and toss to combine. Top with bread-crumb mixture and broil until golden brown, about 2 minutes. Cool 5 minutes. Serve.

Download a printable recipe here!
.

Mijn wens....

Mijn wens voor 2011: voor iedereen een goede gezondheid, innerlijke rust  en veel genieten van de mooie dingen van het leven, hoe klein ze ook mogen lijken.
Neem de tijd om stil te staan bij de belangrijkste zaken in je leven en vergeet al de rest....
Enjoy life....
Sabine


Van Eyck tot Dürer

Van Eyck tot Dürer

Tip voor een 'cultureel' uitstapje: expositie in Brugge


De grote tentoonstelling ‘Jan van Eyck, de Vlaamse Primitieven en het Zuiden’ die het Groeningemuseum in 2002 organiseerde, toonde hoe de Vlaamse Primitieven Zuid-Europa veroverden. Nu kijkt Brugge richting Oosten.
‘Van Eyck tot Dürer’ illustreert voor het eerst wat voor een artistieke revolutie de Vlaamse Primitieven teweeg brachten in het Centraal-Europa van hun tijd. De kunstzinnige en technische vernieuwingen van talentrijke schilders als Jan van Eyck wisten zich razendsnel over deze bijzondere regio te verspreiden en inspireerden de lokale kunstenaars en de jonge Albrecht Dürer. De kruisbestuiving tussen trotse tradities en nieuwe invloeden leverde een rijke erfenis op.
Van Eyck en Dürer zijn grootmeesters uit de periode 1420-1530, titanen uit de westerse kunstgeschiedenis. Het
Groeningemuseum verenigt hen in een prestigieuze tentoonstelling met belangrijke bruiklenen uit Europese en
Amerikaanse topcollecties. Meesterwerken van grote namen zoals Bouts, Campin, Lochner, Memling, Schongauer,van der Goes en van der Weyden en topstukken van hier minder bekende maar niet minder geniale meesters uit Centraal-Europa. Schilderijen maar ook tekeningen, miniaturen, prenten en sculpturen nemen je mee naar de boeiende confrontatie tussen de Vlaamse Primitieven en kunst uit Centraal-Europa.
Een van dé culturele belevenissen van 2010. Nog tot 30 januari 2011.

Groeningemuseum, Dijver 12


(bronvermelding: website Groeningemuseum)